Plan Details
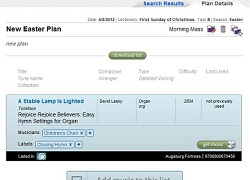
Plan Details is where you do the work of collecting and organizing the works you want in a particular Plan. Each work you’ve chosen to put in this Plan is shown as a light blue module with a black bottom band. Watch the Tutorial Video here.
At the Top of the Plan Details Panel

At the top right, just under the “Plan Details” tab, is the Date, Lectionary Day, and Season that you’ve entered for this Plan. (These aren’t required pieces of information.) Just below that, at the left edge of the panel, is the Title of your Plan. Toward the right of this is the Service you’ve entered, followed by several tool icons.
The folder-with-pencil icon allows you to edit any of the basic information about the Plan, including Title, Date, Lectionary Day, Season, and Service. You can also add Notes to any Plan: these could be reminders, background, or other information you want to keep with the entire Plan.{br}
The trash can icon allows you to delete the entire plan. You’ll be asked if you really want to do this, but once done it cannot be undone.{br}
At the right is the tool for duplicating the Plan you’re looking at. Perhaps you want to repeat most or all of a Plan for a different date or service: just click on the Duplicate Plan button and this Plan will be duplicated as “Copy of [your Plan Title]”; the Date will be blank in the copy but all other information will be preserved. Simply open that Plan to change its Title, add a Date, or change the Plan’s contents.
Below this row is space where any Notes you’ve added to this Plan will appear.
Download List button
The green Download List button causes Prelude to generate an editable text document of the Plan you’re looking at. This text document will include all the information you need about the Plan as a whole (Title, Date, Service, Season) and a listing of the works within this Plan.
Working with Each Item within your Plan

The information shown on the upper part of the blue area is the same, and works in the same way, as that shown in Search Results. In the lower part of the blue area are Plan-specific tools:
- The Musicians area allows you to add Musicians to each work. Click on the plus sign button to add another of the Musicians you’ve entered in the Settings and Preferences part of the Account area. You can add as many as you wish.
- The Labels area allows you to assign one or more Labels to this work. Click on the plus sign button to add another of the Labels you’ve entered in the Musicians, Labels, and Services part of the Account area.
- At the right is a sliding button that reads “get music.” Click on this and you can see what digital files Prelude has for you to download.
Choosing and Downloading Digital Files
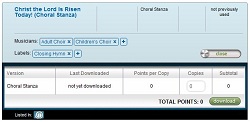
When you click on the “get music” button a panel unfolds, showing the digital files Prelude can provide to you. At the left is shown which “version(s)” (if any) of the work are available. Next to this is the date on which you last downloaded this work; it reads “not yet downloaded” if you’ve never downloaded it. The third column shows you how many of your Points you’ll have to redeem, per copy, for this work. In the fourth column you’ll enter the number of copies you want to download. The Subtotal column, at the right, will show you how many Points in all this download will require.
At the bottom of this area you’ll see the “Total Points”, which adds up the Point totals for all of the “versions” of this work that you’ve selected.
The green “Download” button is next to this, at the right. Click on this to redeem your Points and receive the download. The download will be a zipped (compressed) folder with all of your selected “versions” of this work inside. Read more about working with downloads here.
If you want to buy paper copies of this work from the Publisher (and the Publisher offers them), you can click on the “Purchase from Store” link that’s on the bottom left side of this area.
Library and Publishing Information
In the black band at the bottom of each work in your Plan you’ll see which Library this work comes from (Prelude’s Library, My Church’s Library, or the “My Library” of any user on your account, indicated by their initials) at the left. At the right you’ll see the Publisher and the ISBN or Item Code for this work.